Firstly, to configure the Documents tab, log in to Edulink One’s app or website and click on the administration settings located on the top left of the homepage.

The Documents tab allows you to configure two functions in the user interface: Document Messaging, which allows you to send documents, such as school reports, to parents and learners, and Documents which displays SIMS-linked documents in a PDF format.
It is important to note that the first four fields in the Documents tab relate to document messaging, which is its own separate function in Edulink One’s user interface.
Configuring Document Messaging
To begin, if your school plans to send reports to parents and students by email, you must have the Allow sending reports by email setting turned ON.

Once enabled, several fields appear asking you to select authorised employees that can send messages.
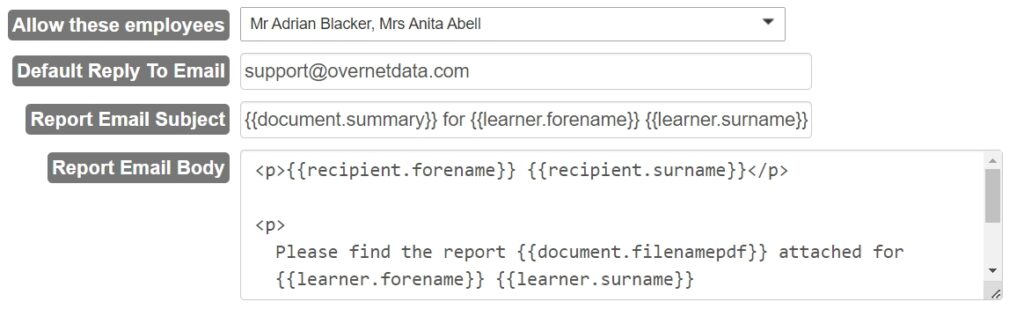
Allow these employees: Select authorised employees who can send documents to parents and learners. This might be a member of the admin team, a data manager, or a member of SLT who has responsibility for school documents.

Report Email Subject: The subject line of the email detailing the content of the report and which child it is for. The default email subject includes variables that are indicated by the brackets, but this can be customised by schools. The variables automatically populate once you have sent the message.

Report Email Body: The message that will be sent to parents regarding their child’s report. The default message includes variables, including the parent’s title, forename and surname, as well as the document file name, learner’s forename and surname and a summary of the document. This can be customised to reflect your school’s needs.

Resetting Your Email Changes
To return to default settings after changes have been made to the email subject and body, select the Set Default button.

Next, a confirmation message appears asking you if you would like to return to the default setting.
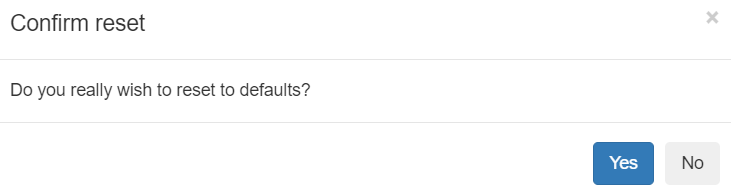
Press Yes to continue resetting the email subject and body to default, or No to cancel.
Configuring Documents
After the first four document messaging fields, the remaining fields are used to configure the Documents function in the Edulink One user interface.
The first set of configurations relates to employee access to documents.

Configure Documents Screen for Employees
Documents Screen for Employees: Allows employees to view documents.

Filter Type: Select how you would like to filter the Document Types, which is located below Filter Type. You can select to filter by Allow Access and tick all the Document Types you would like employees to be able to view, or you can select Deny Access and tick all the Document Types you DO NOT want employees to view.

Document Types: The Document Types you would like your employees to be able to view. Use the Filter Type to filter the documents you would like to allow or deny access to.

Configure Documents Screen for Learners
Documents Screen for Learners: Allows learners to view documents.

Filter Type: Select how you would like to filter the Document Types. You can select to filter by Allow Access and tick all the Document Types you would like learners to be able to view, or you can select Deny Access and tick all the Document Types you DO NOT want learners to view.

Document Types: The Document Types you would like your learners to be able to view. Use the Filter Type to filter the documents you would like to allow or deny access to.

Configure Documents for Parents
Documents Screen for Parents: Allows parents to view documents.

Filter Type: Select how you would like to filter the Document Types. You can select to filter by Allow Access and tick all the Document Types you would like parents to be able to view, or you can select Deny Access and tick all the Document Types you DO NOT want parents to view.

Document Types: The Document Types you would like your parents to be able to view. Use the Filter Type to filter the documents you would like to allow or deny access to.

Further Configuration Settings
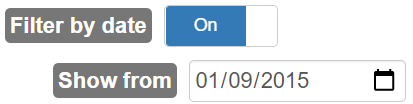
Filter by Date: Turn on to hide documents that are older than the date specified in the Show from field.
Show from: Set a date in Show from to hide documents older than the date you have chosen.
Filter by age: This setting allows you to set the maximum age of the document you would like to filter before it is hidden.

New Document Exclusion RegEx Feature
Exclude documents by summary (regex): If you would like to exclude specific documents from being visible, then turn this field On.

Regular Expression pattern: In this field, type in the title of the document being as specific as possible. Use a pipe | to separate each new document you want to exclude, e.g. Year 9 Autumn Tutor Reports | UCAS. In this case, the pipe | means ‘and’ to the computer, meaning you would like to filter the Year 9 Autumn Reports | (and) UCAS.
In the example below, the DCW and Data & Tutor Report – Year 10 (2021) have been filtered.

Keep matches: If turned on, keep matches will display all matches of the RegEx pattern you have written. If turned off, the inverse of the RegEx pattern will be displayed (exclusions).

Embargo Types
Non-Employee Embargo Types: Select which document types you would like to hide from learners and parents for a specified number of days after a document’s last modification.
For Days: The number of days you would like to hide a specific document type (after the document’s last modification) from parents and learners.

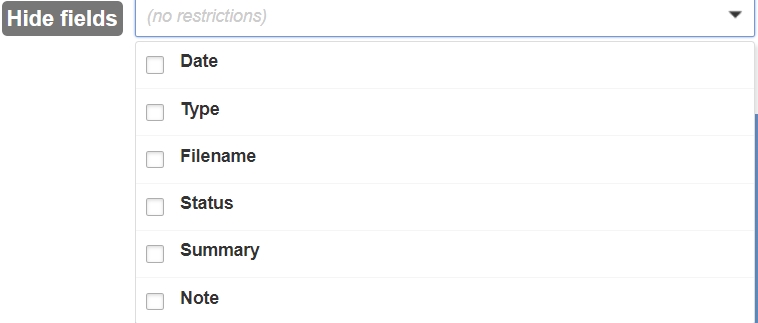
Hide Fields
Hide fields: Select any fields in the documents list that you do not want to see. You can select several fields, such as Date, Type, Filename, Status, Summary and Note.
Restricting Confidential Documents
Lastly, select the Save button to save your configuration.

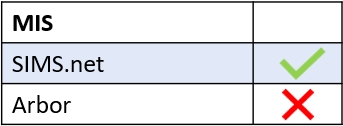
MIS Compatibility