To configure your Email/SMTP for Edulink One, log in to your Edulink One account and select Administration in your settings cog at the top left corner of your screen. Locate the Communicator tab and click it to view the settings.
Firstly, you need to ensure you Enable Communicator screen to configure the Email/SMTP settings. You can disable this later if you prefer, but if you are intending on using the messaging capability in Edulink One, you must ensure this is enabled.

Email/SMTP Configuration
To enable email messaging from Edulink One, ensure that the Enable Email Messaging setting is turned ON.

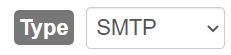
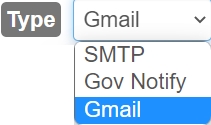
You can select the TYPE of messaging that your school uses, either SMTP or Gov Notify if you are registered with them. Click here to find out more about registering with Gov Notify.
Host: Set your SMTP server address here.

Port: The port to use when connecting to the SMTP host. Microsoft Office 365 (Outlook) and Google (Gmail/ G Suite) use port 587. This information can be found in either your mail account’s settings or your mail provider’s help centre. If you still do not know the correct port number, contact your mail service provider’s support team.

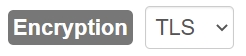
Encryption: By default, the encryption is set to TLS.
Authentication: If the SMTP requires authentication when connecting, turn ‘ On’ and then select the ‘Auth Type’.

The ‘Auth Type’ refers to the type of authentication required. If you select ‘Basic’, enter the username and password to use.


Certain SMTP providers are requiring an OAuth authentication. If you are using one of these providers, i.e. Microsoft, select the OAuth authentication type from the dropdown menu.

Input your Provider in the dropdown menu (Microsoft).

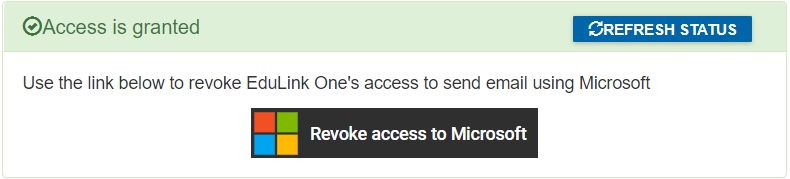
At this stage, a message appears stating that access is not granted; however, to grant access to your SMTP provider, simply click on the Grant Access to button. This will take you to the login screen for your SMTP provider where you need to input the credentials for your SMTP authentication user.
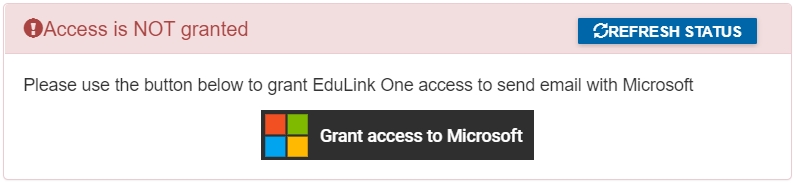
Once access is granted by the SMTP provider, a green box will appear. You can click on the revoke access button at any point if you need to disable access to your SMTP provider.
Gmail Setup
Select Gmail from the ‘Type’ dropdown menu.
A message appears stating that access is not granted. However, you can grant access to your authenticating user’s Gmail account by clicking on the ‘Grant Access to’ button.
This will take you to the login screen for that account where you need to input the correct credentials.
Default from email: The email address to use if the user does not have an email address in MIS.

Override from email: All emails will be coming from this address. Certain SMTP hosts do not allow emails to be sent with a ‘from’ address which is different to the email address of the authentication account. If this is the case for the SMTP host you are using, you should enter the email address for the account you are using for authentication (the reply-to address will be sent to the user sending the messages). This field must always match the authentication settings.
For instance, you have your override from email set up to Edulink@yourschool.com. All the messages in your Received folder will come from this default address; however, when you reply to an email it goes to the person who sent it.

Allow Reply To: Allows certain authorised employees the ability to set the reply address if not using Override from email (required field for Office 365 and Google). This will also set the ’email’s from’ address.

Employee Default Reply To: What the default ‘reply to’ address should be when employees send messages. If nothing is specified in the setting, this will default to the employees’ email addresses.

Restricted Email to: This allows you to restrict email access to only the employees selected.

Email demo mode: If enabled, this allows you to test the function of the system without ever sending an email. By default, Email demo mode is turned OFF.

Message Signature Settings
Enable Message Signature: Appends a signature to all messages using Edulink One. You cannot upload a graphic to this, but you can add the variable {{ sender.name }} which will be replaced by the sender’s name.

Signature Text: The content of the signature which you can customise for your school. The variable {{ sender.name }} will be replaced with the sender’s name.
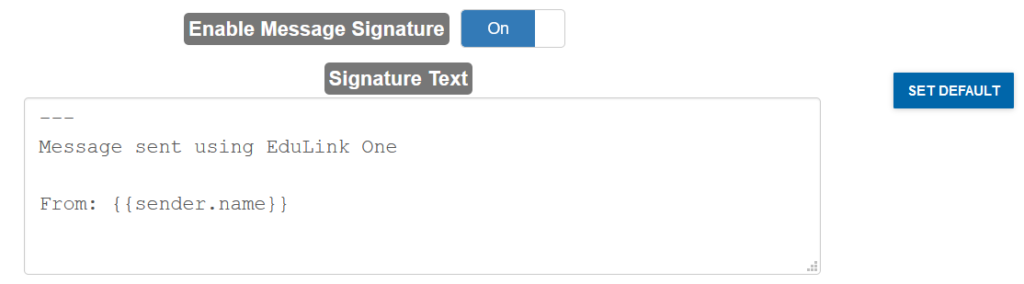
Set Default: The set default button reverts your message to default. You will be asked to confirm this action before your message resets to default.

Append regarding learners: Append regarding learners relates to appending the details of the learner to the signature of the email, or if the sender is a parent, append all children related to the email.

Permissions Settings for Messaging
Allow parents to create new messages: Allows parents to create and send messages using Edulink One to the teacher. If you want to allow parents to send messages, switch this setting ON.

Allow parents to reply to messages: Allows parents to reply via Edulink One to messages sent by the teacher within Edulink One. If you want to allow parents to reply to messages, switch this setting ON.

Allow learners to create new messages: Allows learners to create and send messages using Edulink One. If you want to allow learners to send messages, switch this setting ON.

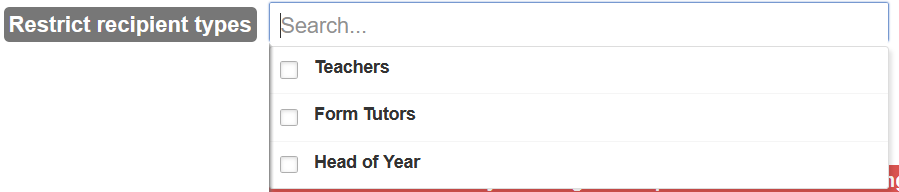
Restrict recipient types: If you want to allow learners to create and send messages, this setting allows you to restrict the recipients of messages to Teachers, Form Tutors and Head of Year.
Parent Select Settings
Restrict parent select options to: Only the authorised employees selected here will be able to restrict the custom parent selection options.

Custom Parent Identification: Configures who Communicator identifies as parents. If turned OFF, only the highest priority parents will get messages as configured in SIMS. If you would like to enable this setting, switch to ON.

Max Priority: This is the order of priority of parental responsibility registered in SIMS. The highest settings (1 is the highest down to 10 as the lowest) will select only those contacts with the highest priority in SIMS, which can be multiple. Ignore will ignore the value of priority entirely. Edulink One will automatically communicate with the highest priority parent in the family by default unless this setting is changed.

Correspondence: Selects only those with correspondence set (data request must be accepted). This is usually set to Ignore.

Restrict employees bulk messaging parents: Authorised employees selected will be the only employees with permission to message parents, whether bulk or single messages.
Note: Teachers can still reply to messages from individual parents.

Further Settings
Autoselect recipients: By default, the system autoselects all recipients when selecting particular recipient types. An example is if a parent clicks ‘teachers’, all of their child’s teachers are automatically selected, enabling this setting means they will have to manually select who they wish to contact.

Switch user: Selected employees can switch users; i.e. they can view the inboxes and outboxes of other users. For example, the Head Teacher’s PA needs to read the Head’s emails to organise the Head’s calendar, etc…

Form tutor recipient- use supervisors: Uses supervisors from SIMS for all form tutors associated with a form group. If set to OFF, it only selects the main form tutor from SIMS.

HOY recipient- use supervisiors: Uses supervisors from SIMS for all Heads of Year associated with a Year Group. If set to OFF, it only selects the main Head of Year from SIMS.

Teachers- only timetabled: Set to ON by default. This will only return those teachers who appear on a student’s timetable, not all teachers of a teaching group.

You have now configured your Communicator Tab settings. Press Save to save your settings and log out if you wish to log out of Edulink One Setup.

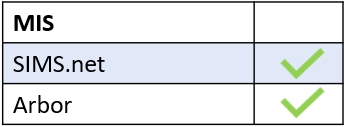
MIS Compatibility